Set Up Email Account on MS Outlook 2010 and higher versions
Step 1. If you are using Outlook for the 1st time- It will prompt you to create a NEW Account ( You May Check Step 2 and Begin ). If you already using Outlook for other Email Accounts then you have to click on File Tab > then Add Account Tab.
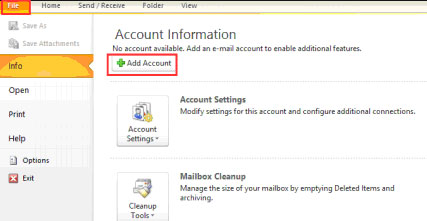
Step 2. Under the Add New Account window, you have to leave all the options blank and Select the button ( Manually configure server settings ) and the click Next tab at the bottom.
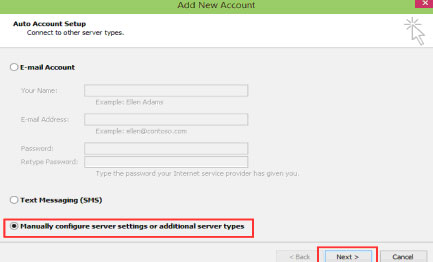
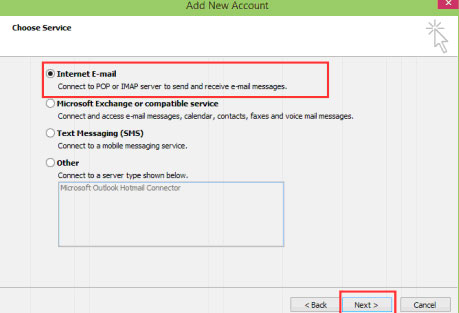
Step 3. Select the Internet E-mail option and then Next.
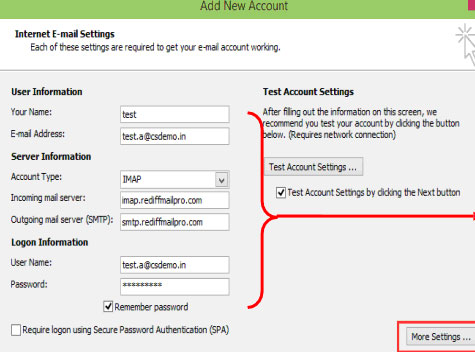
Step 4. Below is the window where you’ll enter server settings as follows for IMAP configuration:
- Your name – Your Name
- Email address – enter the complete email address.
- Account Type – IMAP
- Incoming mail server – imap.rediffmailpro.com
- Outgoing mail server ( SMTP ) – smtp.rediffmailpro.com
- User Name – enter the complete email address
- Password – Password of above email id
- Checkit
 on remember password box
Click on More settings Tab in right side bottom.
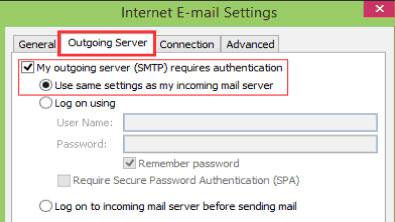
Step 5. A New Window of “Internet E-mail Settings” will appear as shown below. Click on Outgoing Server Tab on the top if this Window.
- Checkit
 on My outgoing server ( SMTP ) requires authentication.
 - Also select the option (•) Use same settings as my incoming mail server
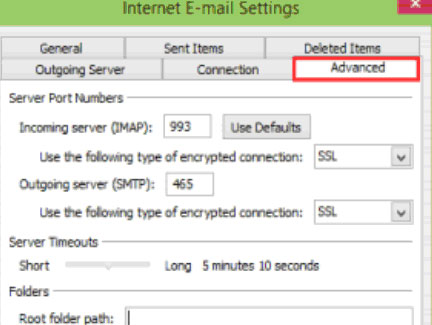
Step 6. Click on the Advanced Tab on the same window and enter below mentioned port settings.
- Incoming server ( IMAP ) : 993
- Use the following type of encrypted connection: Select SSL
- Outgoing server ( SMTP ) : 465 or 586
- Use the following type of encrypted connection : Select SSL
- Server Timeouts : Make it Longer than a Minute
- Click OK Tab.
Step 7. Once you are back to below screen, Click on NEXT Tab, your email id got configured. Folders should Synchronized automatically with an IMAP account, however, if for any reason they aren’t, please perform the below steps. Once you click on Next, then click Finish to complete the Outlook Setup
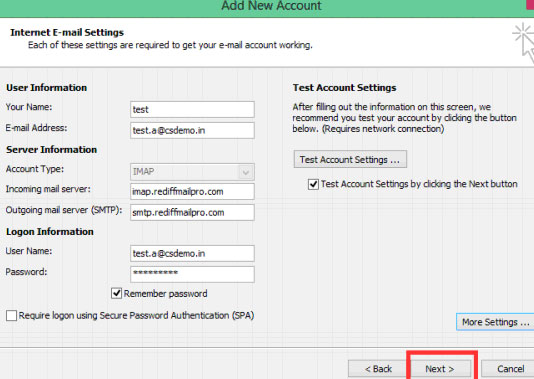
*If Outlook tells you a test fails, double-check to be sure you’ve entered the settings correctly and then Click Finish to complete the settings of adding your Email Account Successfully.
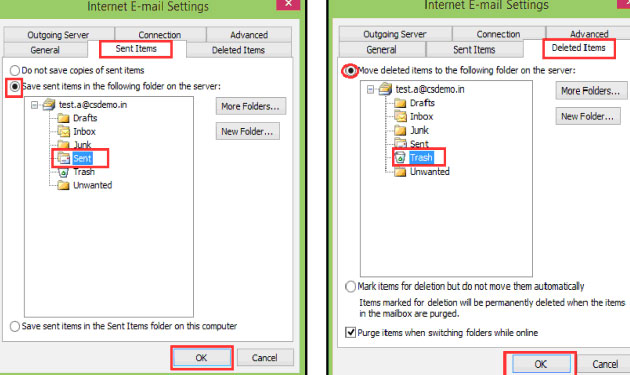
Step 8. To Synchronize Sent items, Select the Sent Items tab. Enable the option “Save sent items in the following folder on the server”. Select the folder where you want to store the Sent Items in. You can press More Folders… if you do not see all your IMAP folders in the list.
Congratulations! You have setup mailbox successfully!